Raspberry Pi 5 photogrammetry rig
Use the Pi as a camera/motion controller and plan reconstruction on hardware suited to the chosen software.
Capture control and reconstruction are different jobs
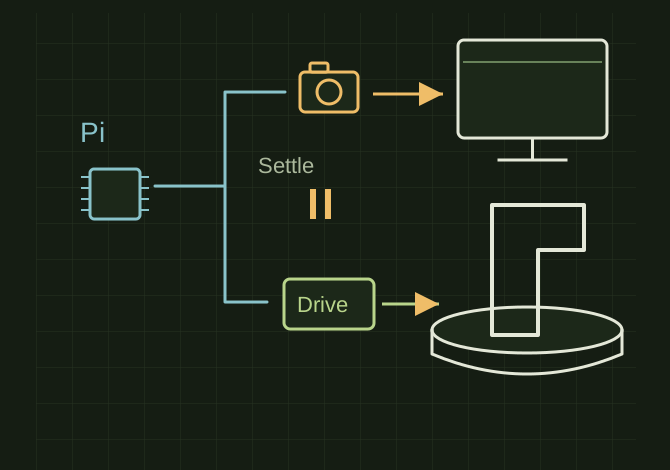 OPEN FULL SIZE ↗
- Pi role
- Camera/motion controller
- Capture
- After mechanism settles
- Reconstruct
- Hardware suited to software
TECHNICAL NOTES///
Use the Pi as a camera/motion controller and plan reconstruction on hardware suited to the chosen software.
GOALRun the first test described in this guide and record the result for raspberry pi 5 photogrammetry rig.
EQUIPMENT
- Scanner / mesh workflow
- Representative test model
- Measurement or inspection method
STEPS
- Verify Pi 5 compatibility for the selected controller, camera and firmware before buying or wiring parts.
- Mount the camera and object securely, provide diffuse lighting and power motors through an appropriate driver rather than GPIO pins.
- Capture each frame only after the mechanism settles. Keep camera settings consistent and preserve original image filenames.
- Transfer a small set to the reconstruction system and inspect alignment before automating a complete scan sequence.
TROUBLESHOOTING
- A project supporting an older Pi does not automatically support Pi 5. Turntable backgrounds may need masking. Motor vibration and rolling-shutter motion create unreliable geometry.
THINGS TO WATCH FOR
A project supporting an older Pi does not automatically support Pi 5. Turntable backgrounds may need masking. Motor vibration and rolling-shutter motion create unreliable geometry.
RESULTOne automated sweep produces sharp, overlapping images that reconstruct successfully.
DEVELOPMENT HISTORY///
Imported as an independent manifest record; public copy keeps uncertainty visible.
SPECIFICATION///
RELEASED MATERIAL///
One automated sweep produces sharp, overlapping images that reconstruct successfully.
The record keeps what is known at this revision. Unfinished tests stay unfinished here.