U225X / ENGINEERING UNWARRANTED
Michael Myers Mask / Filling the Gaps with White Vinyl
Public record / HOW-MASK-VINYL-001 / Revision A
U225X
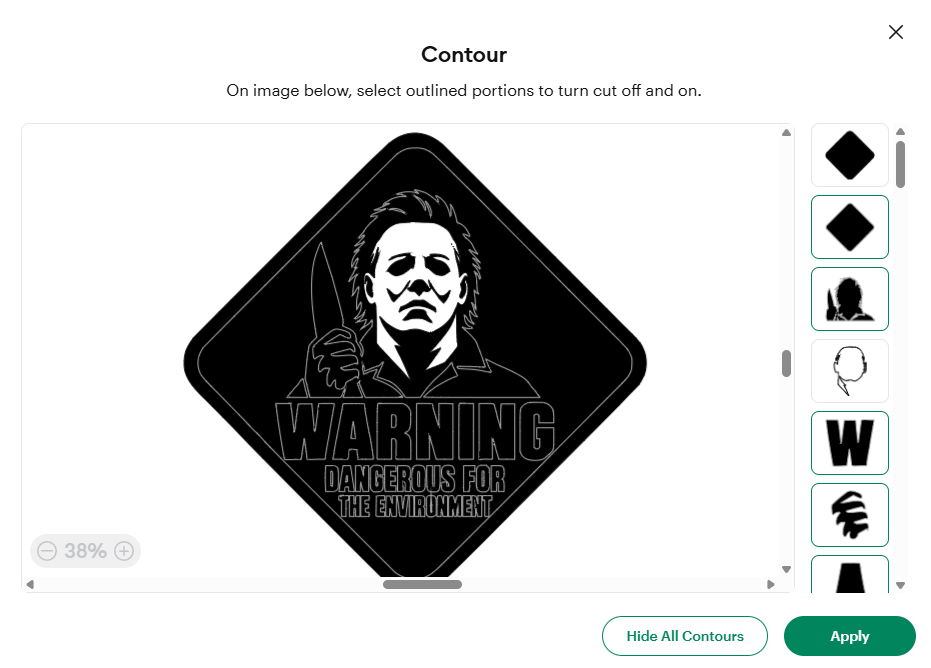
I had a Michael Myers warning-style sticker and wanted white vinyl shaped to fit the face and two neck areas. Starting from the cutting preview, the discussion worked back to the Canvas and into Contour on a duplicate of the existing artwork. The supplied screenshot records the important intermediate state: the mask shape was present, but the large diamond was still active. After the final correction I said I had it and moved on. This post preserves that useful software workflow while leaving the actual white-vinyl cut and application unverified.
TECHNICAL NOTES
The sticker was already made. The next job was to add white to the face and neck without covering the black details. A duplicate, the Contour panel, and one stubborn outer diamond made the difference.
BUILD STORY
This was an adjustment to artwork already in Design Space. The useful starting asset was the original cut geometry, because a new drawing would have introduced another alignment problem.
Define the white areas first. I marked the face and two neck sections in red and clarified that those were the spaces to fill. The black eyes, nose, mouth, and shadows needed to remain visible. That made this a separate shaped overlay rather than a solid white face pasted across all the existing details.
Return to the editable project. The session began in the cutting flow, so the first directions were to use Done and then close Preview Project to return to the Canvas. The relevant artwork was duplicated before editing. Keeping the original provided a reference, and leaving the duplicate's scale unchanged was essential because the sticker already existed at a particular size.
Open Contour on the duplicate's image layer. Cricut's guide describes this as hiding individual cut lines; a multilayer image may need to be ungrouped before selecting the intended layer. In this project's list, a face-shaped contour appeared fourth from the top, immediately above a W. That position was specific to the supplied artwork, so another design should be identified by its outline rather than its thumbnail number.
Isolate the face, then check what remained. The session's first pass used Hide All Contours, restored the face outline, and checked the large diamond separately. The saved screenshot is the intermediate result of that attempt. The follow-up correction was to hide the first solid-diamond thumbnail and leave the face outline alone. It is included here to show the mistake being resolved, not as a ready-to-cut preview.
Inspect the edited copy without changing its scale. The next instruction was to apply the Contour change and move the duplicate into an empty part of the Canvas for inspection. Before cutting an overlay, its face and neck sections still need to be checked against the original, with openings for every dark detail that should show through. A visible face silhouette alone does not prove that all those openings and both neck pieces have been retained.
Prepare a cut-only layer once its geometry is checked. The proposed material was white adhesive vinyl with the operation set to Basic Cut. Cricut's Canvas guide distinguishes that from Print Then Cut; the white material supplies the color. If the desired white pieces occupy separate layers and need their relative placement preserved on the mat, Cricut's Attach guide explains how to attach the same-color pieces. These are preparation notes, not a record of a completed cut.
Keep the stopping point honest. After the correction I replied that I had it and moved on to another project. That confirms the explanation helped, but there is no final Canvas view, saved cut export, test cut, or applied-mask photograph in the recovered exchange. The next useful addition is the isolated white layer at the original size, followed by a photo showing how it fits the existing sticker.
SPECIFICATION
FIELD IMAGES 01 ATTACHED
NEXT TO ADD
- Final Canvas screenshot showing the isolated face and both neck pieces with the intended detail openings
- Saved Cricut project or reusable cut file for the completed white layer
- Original sticker dimensions and confirmation that the overlay retains that scale
- White-vinyl material and cut settings, plus a test-cut result
- Photograph of the applied white layer and notes on alignment and adhesion